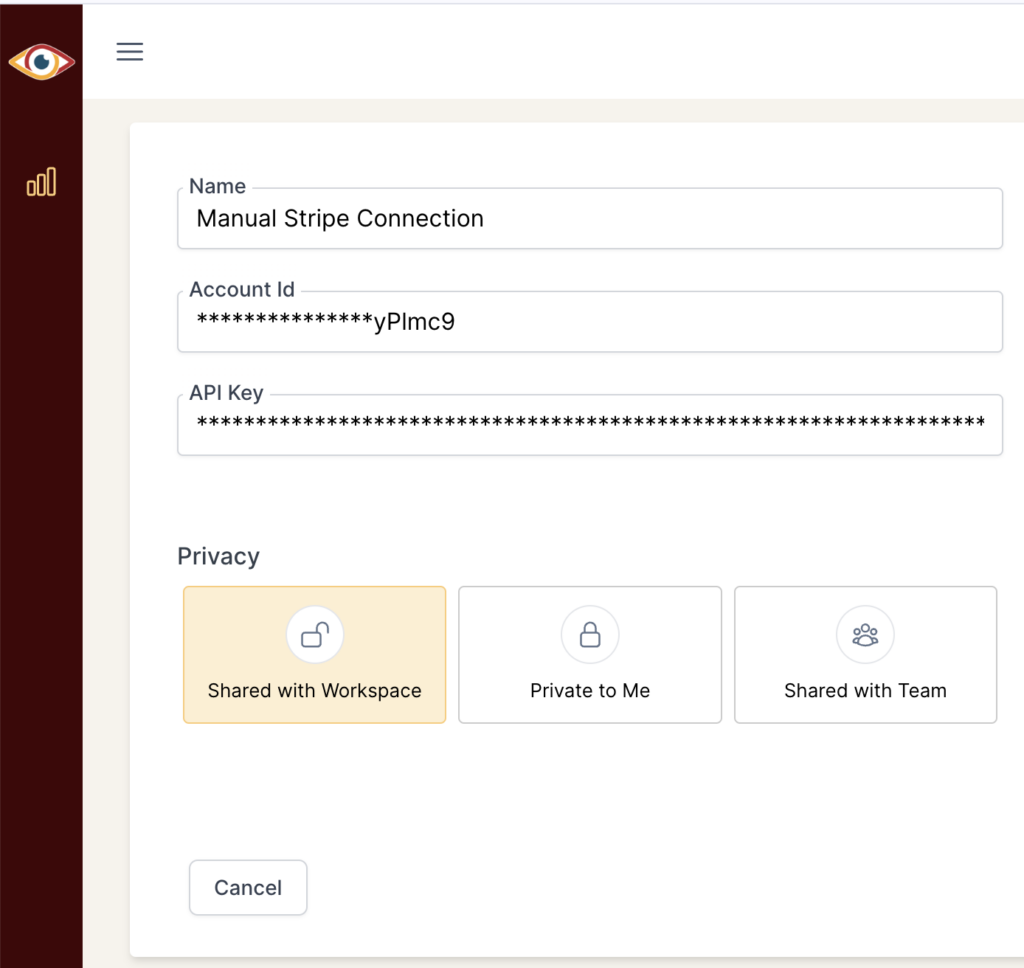
Stripe Connection
In this guide:
Introduction
In this guide, we’ll go over how to create the Stripe Connection for BlinkMetrics. This will allow BlinkMetrics to pull data from Stripe as a Source.
Authorizing Stripe Connection
1. Go to the Connections Page
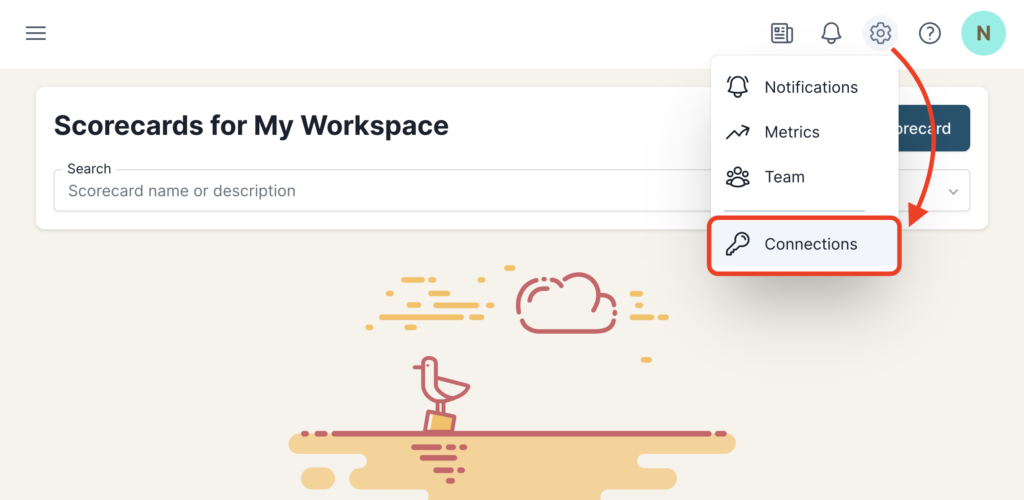
To create the Stripe Connection, click on the Settings cog icon in the header > select the Connections menu item. This will open the Connections page. Next, click the Add Connection button.
2. Add Connection
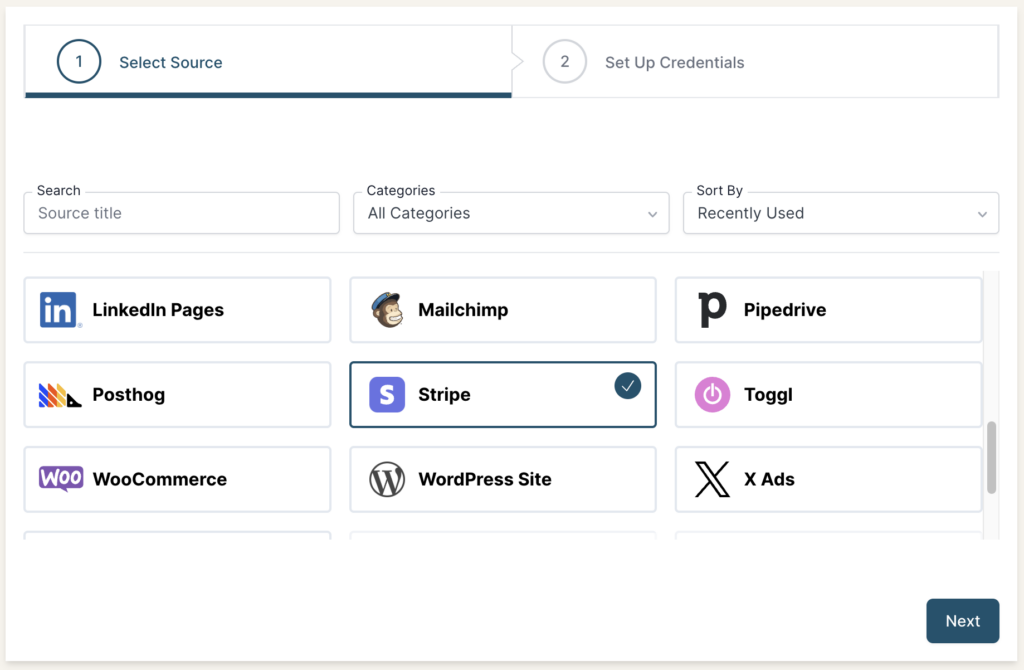
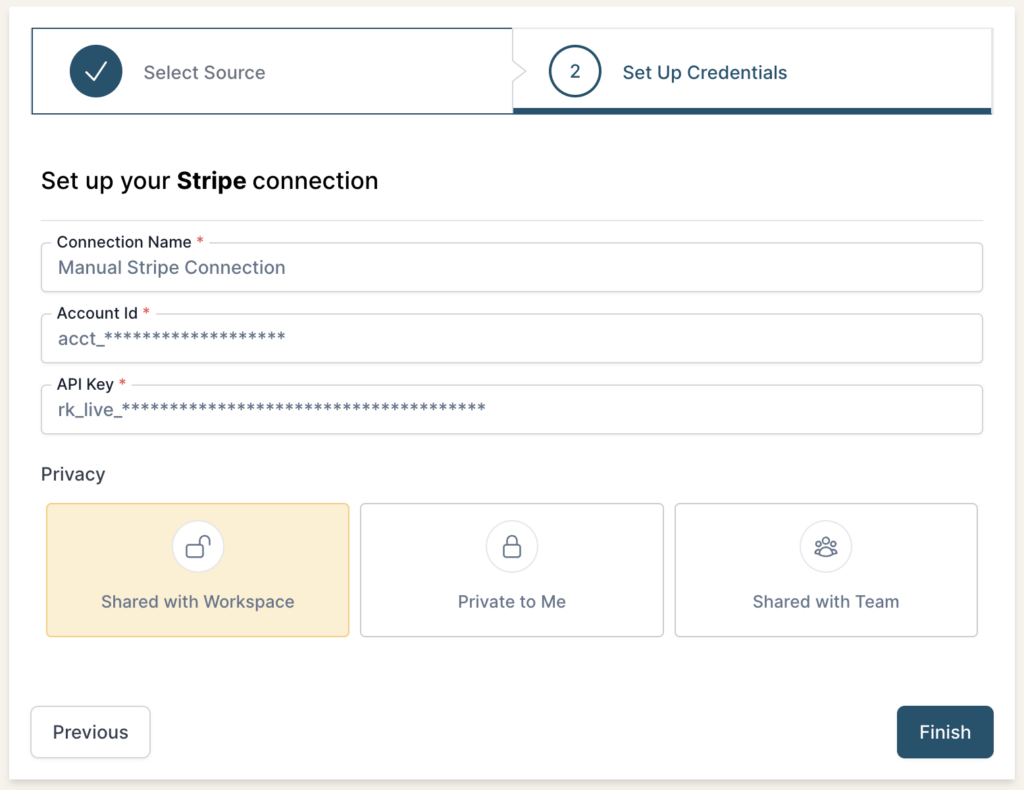
From the Connection Stepper interface, select Stripe in the Select Source tab. In the Set Up Credentials tab, you’ll see a few fields that we need to fill in. Open a new tab and go to the next step in the guide. Don’t close this tab, though; we’ll need to return to this BlinkMetrics page in Step 4 below.
3. Collect Stripe Account ID and API Key
To create a connection with BlinkMetrics, we’ll need to collect the following two items from your Stripe account:
- Account ID
- and API Key
3.1 Stripe Account ID
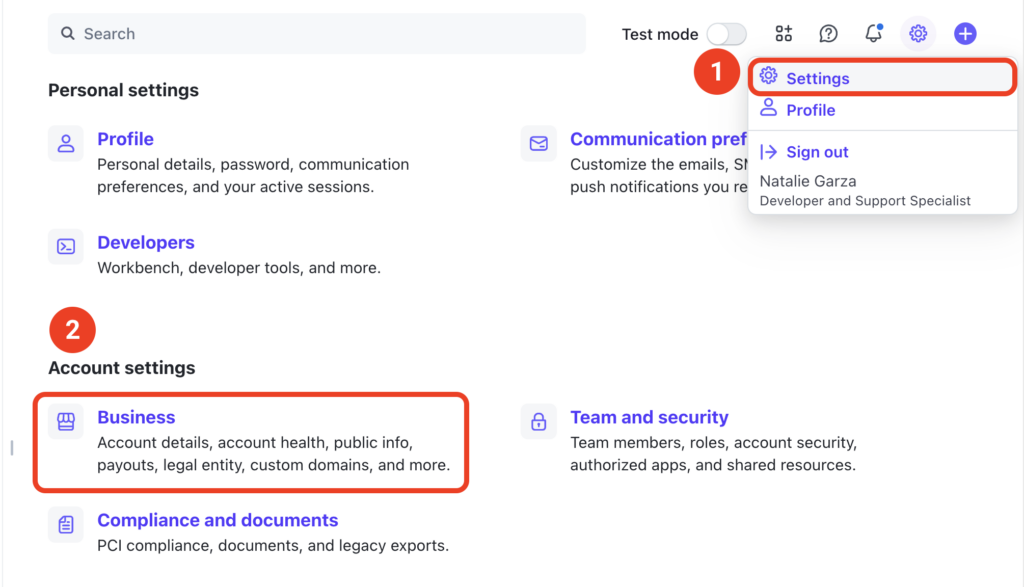
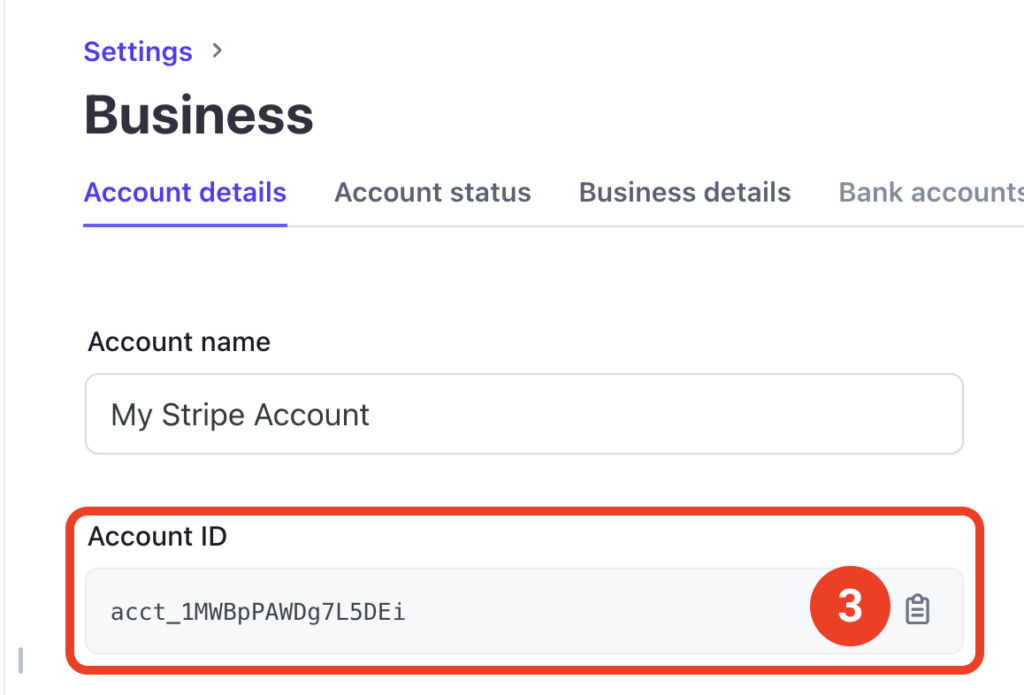
To collect the Account ID number, visit the Business Account Details Page in Stripe (you must be logged in for the link to work).
Or, you can navigate the Stripe account to get to the same page:
- Click on the Settings Icon in the top-right corner > Settings menu item
- Under the Account Settings section, select the Business link
- In the Account Details tab, copy the Account ID; we’ll need to add it to BlinkMetrics in the next step
3.2 Stripe API Key
Next, we’ll need to collect the Stripe API Key as part of the BlinkMetrics connection setup.
To collect the API Key, visit the API Keys Developers Page in Stripe (you must be logged in for the link to work).
Or, navigate to it in the Stripe account by clicking on the Developers link in the bottom-left corner > API keys tab. From here, you’ll need to create the API Key:
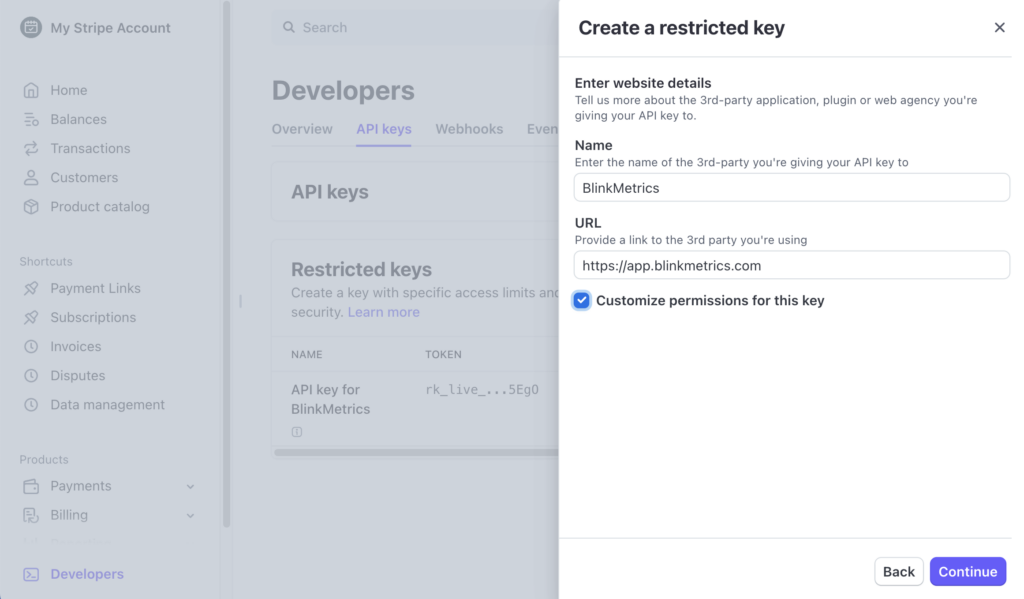
- Under the Restricted Keys section, select the Create Restricted key button
- It’ll ask, How will you use the API key?, where you can select the Providing this key to another website option
- Enter the following information to Create a Restricted Key and then click Continue:
- Name: BlinkMetrics
- URL: https://app.blinkmetrics.com/
- Customize permissions for this key: Enable. In the next part, we’ll need to mark all the permissions as Read-Only.
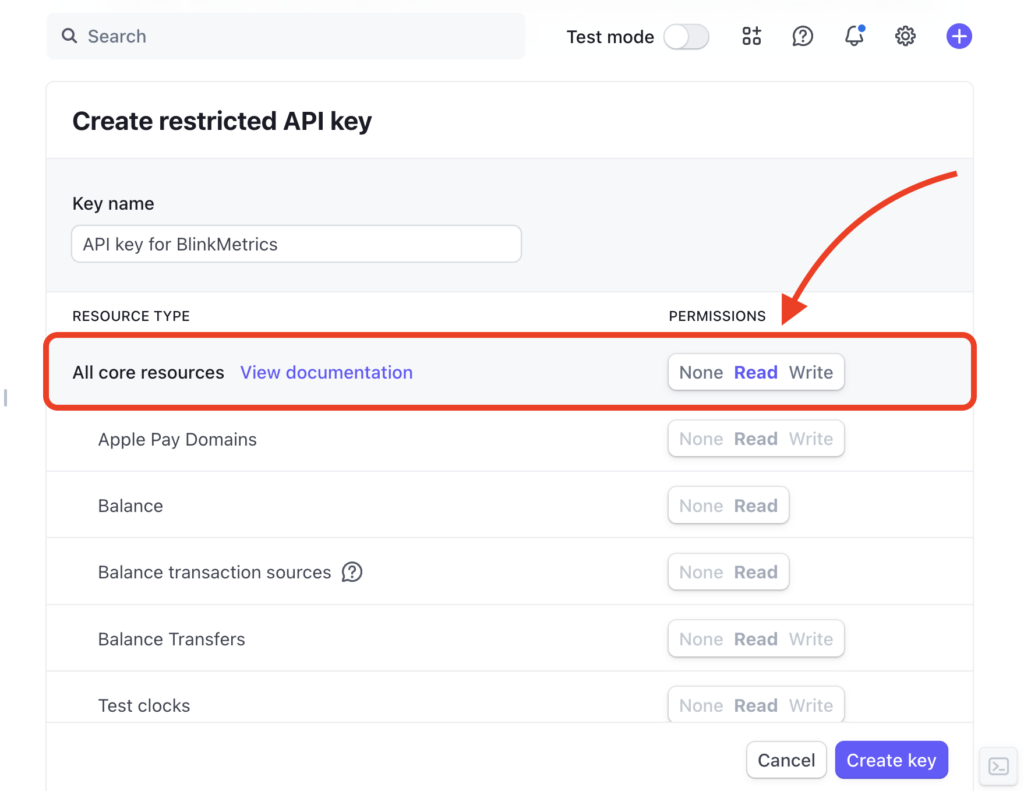
- After continuing, you should see a page where you can select the permissions for the restricted API key. Go through and select Read for ALL permissions in the list.
- If you select Read for the parent permission, such as All Core Resources, it will auto-select Read for all the children’s permissions.
- Do NOT enable Write permissions for any of the rows. If there is no Read option, then select None.
- Lastly, click the Create key button; copy the new key. We’ll need to add it to BlinkMetrics in the next step.
Special Exceptions For Setting Permissions
Stripe Connect
If you’re using the Stripe Connect product, you’ll see TWO permission columns, so make sure to enable ALL read-only permissions for BOTH columns.
Identity Only
If you’re using Stripe’s Identity product on your account, please set the conditions as follows under the Identity section of the permissions:
- Verifications Sessions and Reports: Read
- Access recent detailed verification results: Read
- Access all detailed verification results: None
Otherwise, if you select Read for all of the permissions, you’ll get the error when saving the permissions.
Permissions Needed
For an account to successfully connect to BlinkMetrics, it must have access to its plan’s API key settings, which are available by default for Account Owners. However, the ability to Create, view, edit, and delete API keys is limited to a few Stripe roles only, including:
- Administrators
- Super Administrators
- Developers
If you can’t access the API Keys tab or the Developers settings page, contact the Stripe account owner or the Administrators.
4. Set Up Credentials in BlinkMetrics
Now that you’ve collected your Account ID and API Key from Stripe, paste them into their respective fields in the Set Up Credentials tab in BlinkMetrics.
Enter a Connection Name; this is just for organizational purposes, and we recommend you provide details on which account it was connected to.
Select the Privacy level for the connection (you can edit this later too): Shared with Workspace, Private to Me, or Shared with Team.
When you’re done, click Finish.
5. Review Privacy and Save Connection
Once you complete the connection, you’ll be redirected back to the Stripe Connections page. You can click the new listing to view the Connection detail page. From here, you can edit the following:
- Connection Name: Used for organizational purposes, each Source can have multiple Connections, so it’s helpful to see who authorized the Connection or which account it was connected to.
- Account ID: If you need to update your Stripe Account ID, you can swap it here.
- Note: If you need to create a connection with another Stripe account, add a new connection instead of swapping Account IDs to retain past data.
- API Token: If you need to update your Stripe API Key, you can swap it here.
- Privacy: You can choose who it’s shared with: Shared with Workspace, Private to Me, or Shared with Team.
And that’s it! You can now use the Connection to pull data from the Stripe Source. You’re done!
